Brake cable replacement/fitting guide
Here is a guide that will help you replace either Knott or Al-ko detachable trailer brake cables. This guide will illustrate the processes you will have to go through, as well as point out any important information that could prove useful to a trailer owner.
First of all, you will have to find a way to lift the trailer enough to be able to work underneath it comfortably. The best way would be to use a hydraulic lift. Not everybody will have access to such equipment, so car jacks or ramps would be a suitable alternative as long as it is safe.
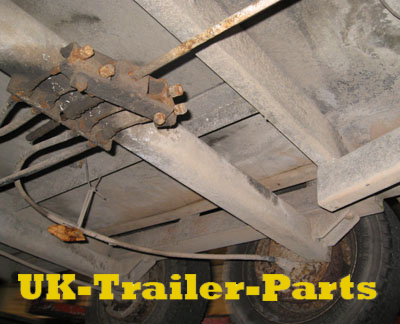
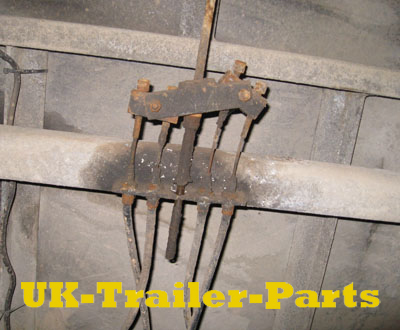
When you have the trailer in the air and secure, take a look underneath and locate each end of all the brake cables. Depending on the condition of your trailer you should see something similar to the example below.
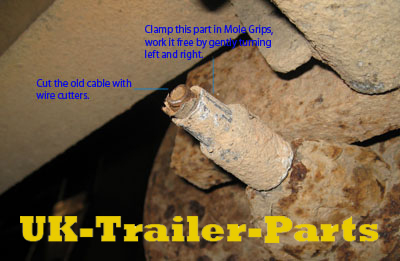
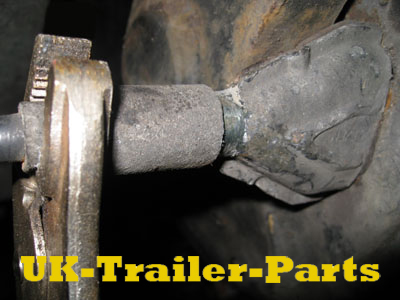
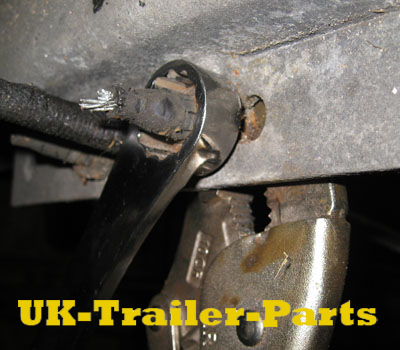
To remove the end of the brake cable that is attached to the back plate of a brake you may need a set of Mole Grips. If you cannot remove this fitting by hand, clamp the smaller part of the metal connecter firmly in the grips and gently work it loose from the back of the brake. As the cable comes away from the brake, watch for a small metal plate that may come off with it.
This is known as the cable cover plate and will need to be put back when the new cables go on. If this small plate is too badly corroded or was bent out of shape during removal of the cable, replace it with a new one.
Badly rusted brake cables that have become seized can be very difficult to remove in one piece. The simplest way to remove cables like this is to cut through them just before the metal connecter that connects to the back of the brake. Large wire cutters should be able to cut through them with some force. Remove the cable that has been cut away, leaving only a small section that remains firmly attached. This smaller part will now more manageable and easier to remove.
Work this smaller section free with Mole Grips.
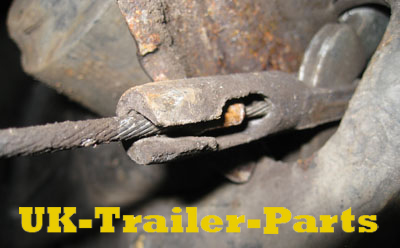
After removing a cables connection from the back plate, make sure to check the expander inside the brake itself. By gently pulling on the bare cable you can assess the condition of the inside of the brake. The cable is attached to a small eyelet inside the brake that should pull out a short way when the cable is pulled. This eyelet should also freely return to its original position when released. If it does not, there is a strong chance that the expander has rusted inside the brake.
If this is the case the expander cannot expand and contract freely, which may cause loss of brakes or even complete seizing. You will have to remove the wheel, hub cap, split pin, castle nut and brake drum in order to get to this and investigate.
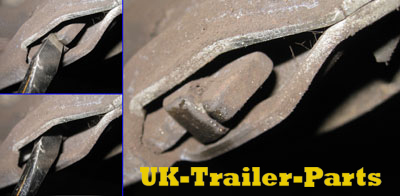
With a screwdriver, check the expander as shown here. It should move easily and return back to its original position when released.
Use a spanner and socket wrench to remove the sections of old cable that are attached to the brake cable anchor point and compensator. If they are rusted over and removing them is proving difficult, cut through the cable with cutters again. This should make things a little bit easier.
When all of the old brake cables have been completely removed, take this opportunity to check over the underside of the trailer looking for excessive rust or wear.
If you have not already, you should now identify what type of new brake cables you need. It is important to get this right as different brake manufacturers use different fittings and connections, so you will require a specific type of cable. If you need some help identifying the cables you need, view our post on identifying brake cables here.
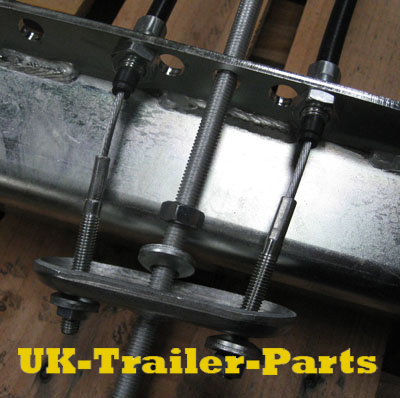
Once you have the correct cables, begin to fit them to the trailer working from front to rear. The threaded end of the cable has to be bolted into the brake cable anchor point. To do this, simply remove the bolt from the end of the cables sleeve and thread the cable into the anchor point. Tighten the bolt back up to lock the cable in position.
It is important to note that when securing brake cables into the anchor point you will need some kind of order. The most straight forward example would be as follows: Left-hand brake cable to left-hand anchor point, Right-hand brake cable to right-hand anchor point. It is possible to switch the order of cables around in the anchor point to take up slack in the cables if necessary. This will work, but it will also become more complicated, especially on trailers with multiple axles.
Work your way to the rear of the trailer, routing the new brake cable through the chassis as you go. Make sure the cable is secure, not hanging down or caught up on any moving parts. If you cannot find a suitable place to fasten cables to the underside of the trailer, or are worried that cables may come loose, use some tie-wraps to make sure their secure.
Offer the ‘cup’ end of the new cable up to the brakes back plate where the old cable used to be. If you remove the cable cover plate from the back of the brake you will see a small eyelet attached to the brakes expander. Secure the cable in it.
*Important* It is worth noting that this eyelet is a slightly different shape on Knott and Al-ko brake systems. Below is an example of a Knott eyelet.
Some older braking systems use a ‘Fixed-eye’ cable. In this case the small lug on the cable will be a metal hoop, and the eyelet in the back of the expander will be a small hook. If you are using this type of cable, place the hoop over the hook and secure the cable through the back plate of the brake. There will be no cable cover plate on this type of brake so you will have to remove the hub cap, split pin, castle nut and brake drum in order to do this.
After connecting the cable to the expander, re-fit the cable cover plate. You have to push the ‘cup’ end of the new cable over the circular end of the cable cover plate to firmly secure the two together. A small amount of grease in the cup of the cable will make getting it into position easier, seal out water and help prevent rust.
When all of the new cables have been fitted, you must next set up the trailer brake compensator. Different makes of cables have different connections when it comes to connecting to the compensator. New Al-ko and Indespention brake cables can have a large stud called a Nipple that makes connecting them to the compensator quick and simple. Most other manufacturers use a threaded connection that requires a nut to fasten them to the compensator.
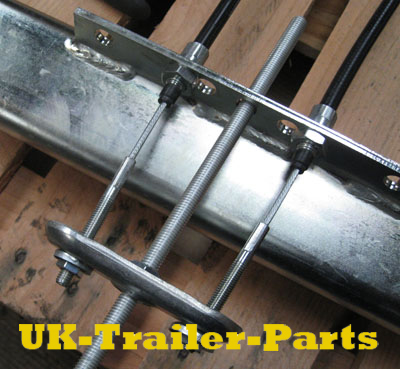
Connect the cables to the compensator and begin to tighten the nuts that are holding the cables in it. Continue to tighten these nuts until you can feel that some of the slack in the cables has been reduced. It is very important that you make sure not to tighten these unevenly as this will cause uneven braking pressure. As well as tightening the two nuts holding the cables in place, there is a third nut on the tension rod that when tightened increases the distance between the cable anchor point and the brake compensator.
Increasing the distance between these two points should take out any slack in the cables, but is NOT the main point of adjustment for the trailers brakes. The main adjuster for the brakes can be found on the back plate of the brake itself. On a Knott system this is a nut that is simply tightened to expand the brake shoes and loosened to allow them to contract.
On an Al-ko system this adjuster is in the same place, but it requires a small gear inside the brake to be turned with the end of a screwdriver. Adjust the brakes here until you can just feel them starting to bind. Adjusting the brakes well here will make adjusting the compensator easier.
When adjusting the compensator do not leave too much slack or the brakes won’t work, do not over tighten the adjuster either as it will apply the trailers brakes permanently. A well adjusted trailer brake compensator should take all of the slack out of the brake cables without causing the brakes to bind. The compensator should also remain nice and strait, running parallel to the brake cable anchor to aid even braking.
Related articles:
Identifying trailer brake cables
If you are looking to buy trailer brake parts, choose from a large selection at… 

