This guide is to assist you in identifying all the different Coupling parts.
Coupling Parts
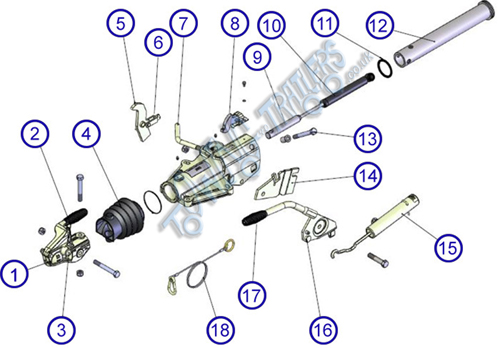
All the parts of a Coupling are shown in the exploded diagram below, hover over each number to identify the name of the part.
Back to Top |
Comments Off on Identifying Coupling Parts
This guide is to help identify the reasons why your trailer may be banging into the back of your vehicle when you engage the brakes. It is also giving a step by step guide for replacing a Damper.
Reasons why your trailer may be banging
Your trailer may be banging when you brake due to the Damper in your Coupling being worn. The Damper acts like a shock absorber. If the damper is damaged your vehicle may bounce, drift whilst braking or the trailer will ‘nose dive’ into the back of your vehicle. If this is the case, your Damper will need replacing.
The reason a Damper becoming damaged could be due to poor Brake Adjustment. It could also be due to the seizing of parts, which prevents the Damper from doing its job correctly. If your Damper has been worn for some time, the Stop Ring can also begin to wear out.
All parts are shown in order on the drawing below. Use the numbers on the drawing to find the part you require.
Back to Top |
Comments Off on Why is my Trailer banging when I Brake?
This guide is to instruct you on the steps for replacing a Knott Damper in a Coupling.
Replacing a Knott Damper
Step 1 – Remove the Gater (Bellows) from the rear bolt on Coupling as shown below.

Step 2 – Remove both front bolts with a 19mm spanner, to remove the Coupling Head

Step 3 – Then, remove both rear bolts from your Coupling Body demonstrated in the diagram below.

Step 4 – Remove the rear Damper bolt

Step 4 – You then need to remove the Coupling head by unscrewing the second bolt on the front of the Coupling, to be able to withdraw the damaged Damper from the Damper Mount.

Step 5 – Withdraw the damaged Damper from your Coupling.

Finally – Insert a new damper into your Coupling and screw in all bolts which have been removed for this process and re-attach the Coupling head.
For instructions on how to replace a Bradley Damper, click the link below
“Replacing a Bradley Damper”
Back to Top |
Comments Off on Replacing a Damper for a Knott Coupling
This guide is to explain the basics of an IVA and what may happen during the assessment.
Basics of an IVA Trailer Test
The Individual Vehicle Assessment looks at parts of your trailer that can easily be accessed without any dismantling. You may be asked however to remove/open various parts of your trailer, for example; lockable compartments, carpet etc, to allow assessment to take place. If visual inspection on parts such as Brake Cables are not sufficient, you may be asked to demonsrate that your trailer does indeed comply with the requirements and regulations.
If your trailer does not meet the specific requirements, you will be provided with a ‘Notification of Refusal to issue an Individual Vehicle Approval’ certificate. The certificate will notify you of the items leading to the failure of the assessment along with the reasons why. You can then make an appointment for re-examination for up to 6 months after the issue of a ‘Notification of Refusal’ certificate. If your trailer fails the assessment, you are therefore unable to drive it as it is an offence to tow a trailer requiring IVA without an Individual Assessment Certificate (IAC).
Approval Implemention Dates
| Trailer Type |
Implemention Date |
| Incomplete & complete O1, O4 |
29th October 2012 |
| Completed O1, O4 |
29th April 2013 |
| Special purpose trailers |
29th October 2014 |
O1 Very light trailers, 0.75 tonnes or less
02 Light trailers, 0.75 to 3.5 tonnes
03 Medium trailers, 3.5 to 10 tonnes
04 Heavy trailers over 10 tonnes
Summary of Trailer Requirements
| Assessment Part |
Trailer Applicable |
| Rear Protective Devices (Under Run) |
Applicable for O3 & O4 |
| Rear Registration Plate Space |
Applicable for all trailer categories |
| Steering Effort |
O3 & O4 if fitted with steered axles |
| Brakes |
O2, O3, O4 (O1 if fitted with brakes) |
| Statutory Plates |
Applicable to all trailer categories |
| Installation of Lights |
Applicable to all trailers |
| Retro Reflectors |
Applicable to all trailers |
| Stop and side marker lamps |
Applicable to all trailers |
| Direction Indicators |
Applicable to all trailers |
| Rear Registration Lamps |
Applicable to all trailers |
| Rear Fog Lamps |
Applicable to all trailers |
| Reversing Lamps |
O2, O3, O4 (O1 Optional) |
| Heating Systems |
Applicable to all trailers if fitted |
| Side Guards |
03, O4 |
| Spray Suppression |
03, O4 |
| Safety Glass |
Applicable to all trailers |
| Tyres |
Applicable to all trailers |
| Masses and Dimensions |
Applicable to all trailers |
| Couplings |
All O1 & O2 Trailers |
| Couplings |
All O3 & O4 Trailers |
| General Construction |
All trailers subject to IVA |
For more information on IVA click below to view IVA Inspection manual class 1, 2, 3, 4

Click below to find your nearest IVA Test Station
“IVA Test Stations”
Back to Top |
Comments Off on Basics of an IVA Trailer Test
Tags: assessment, basics, environmental, individual, IVA, law, requirements, safety, standards, test, trailer, vehicle
Where to get an Individual Vehicle Inspection
| Station |
Category of Trailer |
| Aberdeen |
O1, O2 |
| Beverley |
O1, O2 |
| Bristol |
O1, O2, O3, O4 |
| Cardiff |
O1, O2 |
| Carlisle |
O1, O2 |
| Derby |
O1, O2, O3, O4 |
| Edinburgh |
O1, O2, O3, O4 |
| Exeter |
O1, O2 |
| Gillingham |
O1, O2, O3, O4 |
| Kidderminster |
O1, O2 |
| Leighton Buzzard |
O1, O2 |
| London North |
O1, O2 |
| London West |
O1, O2 |
| Manchester |
O1, O2, O3, O4 |
| Newcastle-upon-Tyne |
O1, O2 |
| Norwich |
O1, O2 |
| Nottingham |
O1, O2 |
| Southhampton |
O1, O2 |
O1-Very light trailers 0.75 tonnes or less
O2-Light trailers 0.75-3.5 tonnes
O3-Medium trailers 3.5-10 tonnes
O4-Heavy trailers over 10 tonnes
Click below below for information on the basics of an IVA Trailer Test
“Basics of an IVA”
Click below to view IVA Inspection manual class 1, 2, 3, 4
Back to Top |
Comments Off on Where do I go for an IVA?
This guide is to inform you about the different Type Approvals available for trailers and the reasons why we need to have Type Approval.
What is Type Approval?
Type Approval is an assessment to ensure that trailers meet specific legal requirements and abide by laws and regulations. It is to examine the safety, security and environmental impact of a trailer for it to then become legal to drive on the roads. The three different routes for Type Approval are;
ECWVTA -European Community Whole Vehicle Type Approval
If you manufacture large amounts of the same trailer in a year, you should apply for ECWVTA. This means that, providing your trailers pass the assessment, you have the ability to produce a certificate of conformity for each individual trailer. It also allows you to sell trailers across Europe without any further assessments.
NSSTA -National Small Series Type Approval
This is for manufacturers that only produce small numbers of trailers in a year and who sell only in the UK. It is very cost effective for smaller manufacturers, however with NSSTA, you are limited to the number of trailers you can produce in a year. It is not recognised across Europe.
IVA -Individual Vehicle Assessment
UK National Approval Scheme which ensures that imported trailers, individual trailers and trailers manufactured in small quantities are meeting technical requirements in Europe. It is designed to make sure that trailers have been constructed safely. Each individual trailer is required to have a physical inspection at a Vehicle and Operator Service Agency (VOSA) site in Great Briain, or at a Driver Vehicle Agency (DVA) if in Northern Ireland.
Benefits of IVA
By carrying out IVA on your trailer, you are making sure that it complies with the UK law. It is certifying that your trailer abides by modern safety law and is having a lower impact on the environment. Any trailer submitted for IVA inspection should comply with the technical provisions of Directive 2007/46/EC.
Trailers affected by IVA
| Trailer Code |
Trailer Description |
| O1 |
Very light trailers 0.75 tonnes or less |
| O2 |
Light trailers 0.75-3.5 tonnes |
| O3 |
Medium trailers 3.5-10 tonnes |
| O4 |
Heavy trailers over 10 tonnes |
Click below below to find your nearest IVA test station
“IVA Test Stations”
Click below below for information on the basics of an IVA
“Basics of an IVA”
Click below to view IVA Inspection manual class 1, 2, 3, 4
This guide is for adjusting Knott trailer brakes. When adjusting brakes you must always start from the Wheel and work forwards.
Adjusting Knott Brakes
Note-Before beginning your Brake Adjustment it is important to strap your handbrake down onto your Coupling. Or, with Indespension, insert an M10 Bolt into your Coupling. This is to prevent injury whilst carrying out your Brake Adjustment. The image below is showing the place where an M10 Bolt should be inserted into an Indespension Coupling.
Securely lift your Trailer off of the ground to give you easy acces to your Brakes and Brake Cables.

You need to make sure that all moving parts (Brake Link, Brake Expander and Brake Rod) move freely. Any parts that are seized will need replacing otherwise corrosion will continue to progress leading to re-seizing of parts. The image below is demonstrating how to loosen the Brake Rod.

The Brake Link needs to have at least 5mm of ‘play’ for adjusting Brakes. The image below is showing the Brake Link which has 5mm of ‘play’.

Your Brake Expander must be fully closed when adjusting brakes. The image below is showing this.

To check for movement in your Brake Expander you simply apply pressure to the expander with a screwdriver and it should press inwards and then spring quickly back. The image below is demonstrating this method.

Once you have made these checks, you can then begin with the Brake Adjustment
Start the adjustment by tightening the nut on the Brake Backplate, with a Ratchet or a Spanner, whilst pushing the Wheel forward as shown below.

Keep tightening the Adjuster until the wheel can no longer be pushed in the forward direction with heavy force. When this happens, you need to then loosen the adjuster in the opposite direction until the wheel spins approximately 1 to 2 rotations in the reverse direction freely.
Once this is complete, you need to adjust your main Brake Rod. To do this you need to re-tighten the nut you loosened at the very start of this procedure, keep altering the tightness of the rod until, when tested, the Handbrake sits at a comfortable 90 degrees angle when pulled up. See image below.

You will also notice that your Brake Compensator is inline and should not be sagging or looking ‘weighed down’ at one end. If you Compensator is sagging, you will need to go back and check your brake adjustment.

Finally, whilst the Handbrake is on, push all the wheels on your Trailer backwards as far as they’ll go. The handbrake should then move even further back.

The Different Sizes of Brakes available
| Knott |
Al-Ko |
| 160mm x 35mm |
160mm x 37mm |
| 200mm x 50mm |
200mm x 35mm |
| 203mm x 40mm |
200mm x 51mm |
| 250mm x 40mm |
230mm x 61mm |
Click below to buy Brakes or for Adjusting Al-Ko Brakes
 |