This guide is for adjusting Al-Ko trailer brakes. When adjusting brakes you must always start from the Wheel and work forwards.
Adjusting Al-Ko Brakes
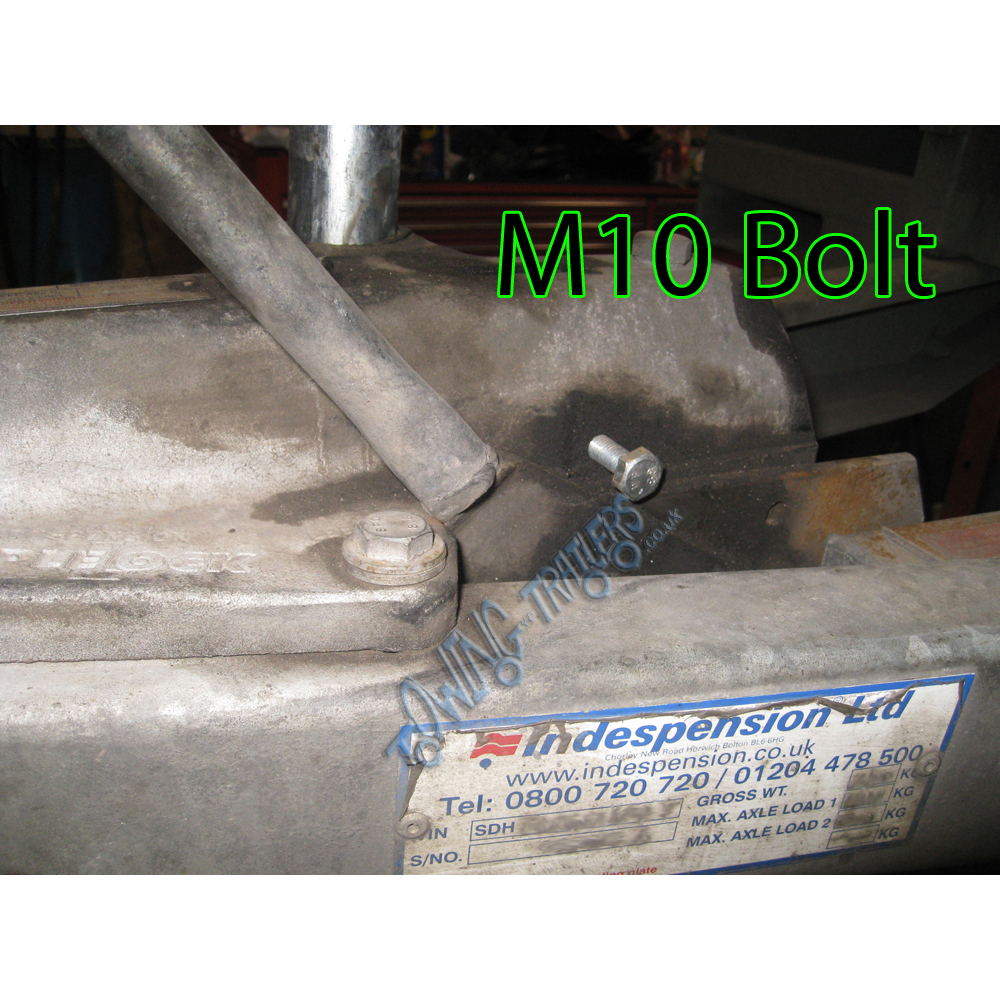
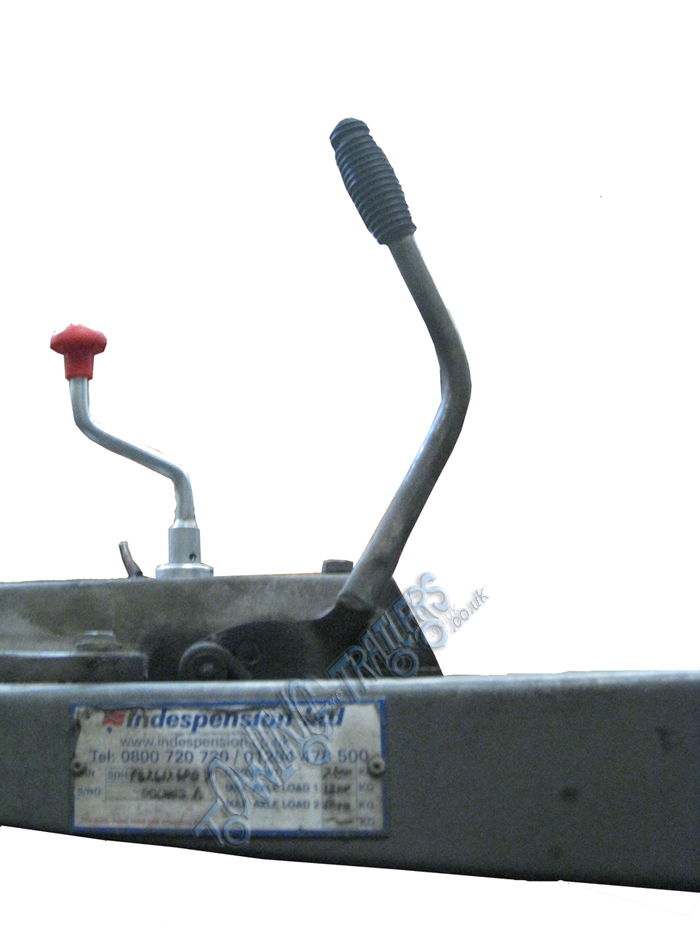
Note-Before beginning your Brake Adjustment it is important to strap your handbrake down onto your Coupling. Or, with Indespension, insert an M10 Bolt into your Coupling. This is to prevent injury whilst carrying out your Brake Adjustment. The image below is showing the place where an M10 Bolt should be inserted into an Indespension Coupling.
Securely lift your Trailer off of the ground to give you easy acces to your Brakes and Brake Cables.
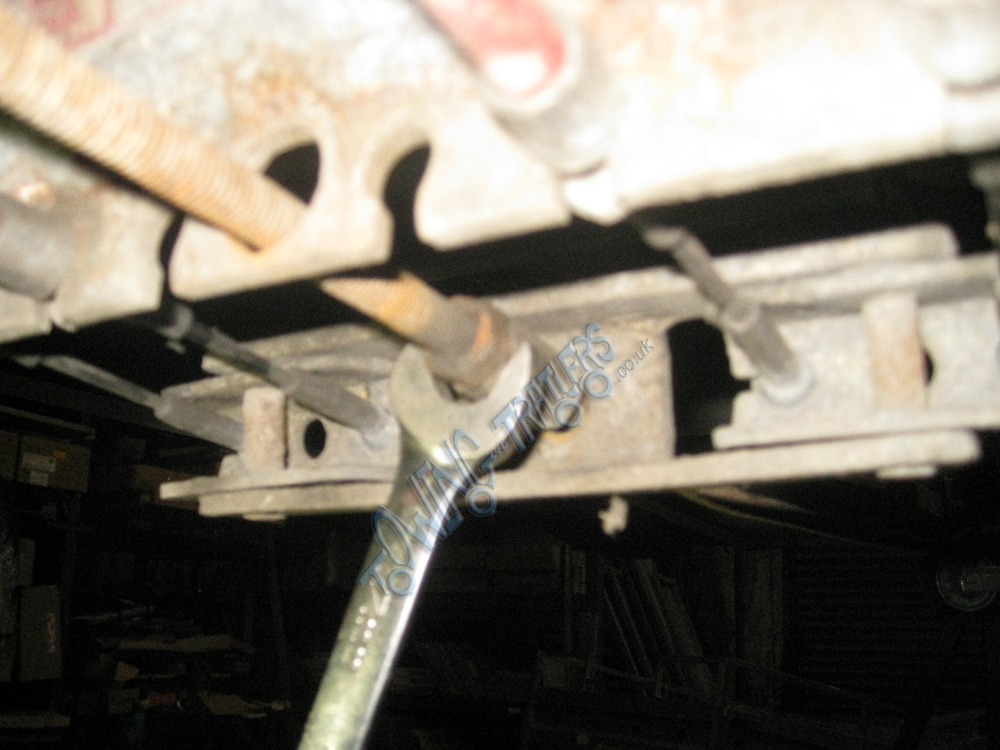
You need to make sure that all moving parts (Brake Link, Brake Expander and Brake Rod) move freely. Any parts that are seized will need replacing otherwise corrosion will continue to progress leading to re-seizing of parts. The image below is demonstrating how to loosen the Brake Rod.
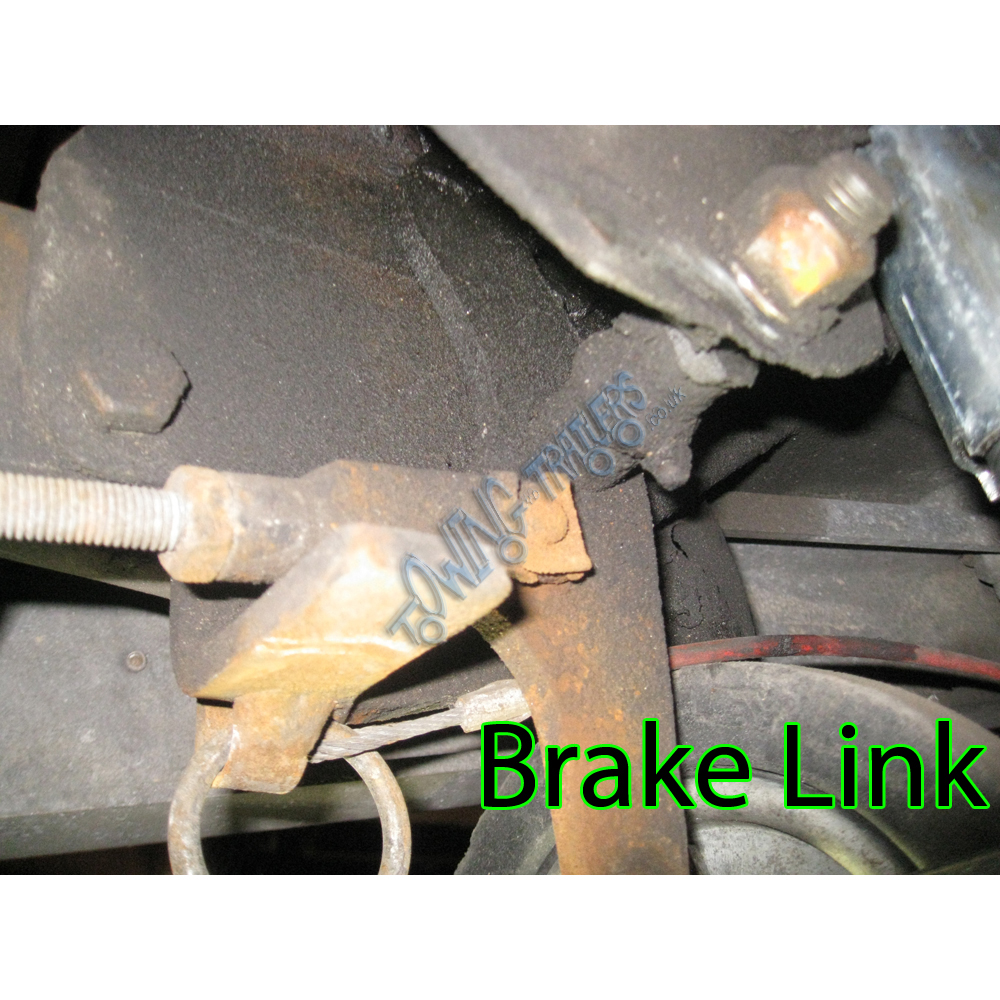
The Brake Link needs to have at least 5mm of ‘play’ for adjusting Brakes. The image below is showing the Brake Link which has 5mm of ‘play’.
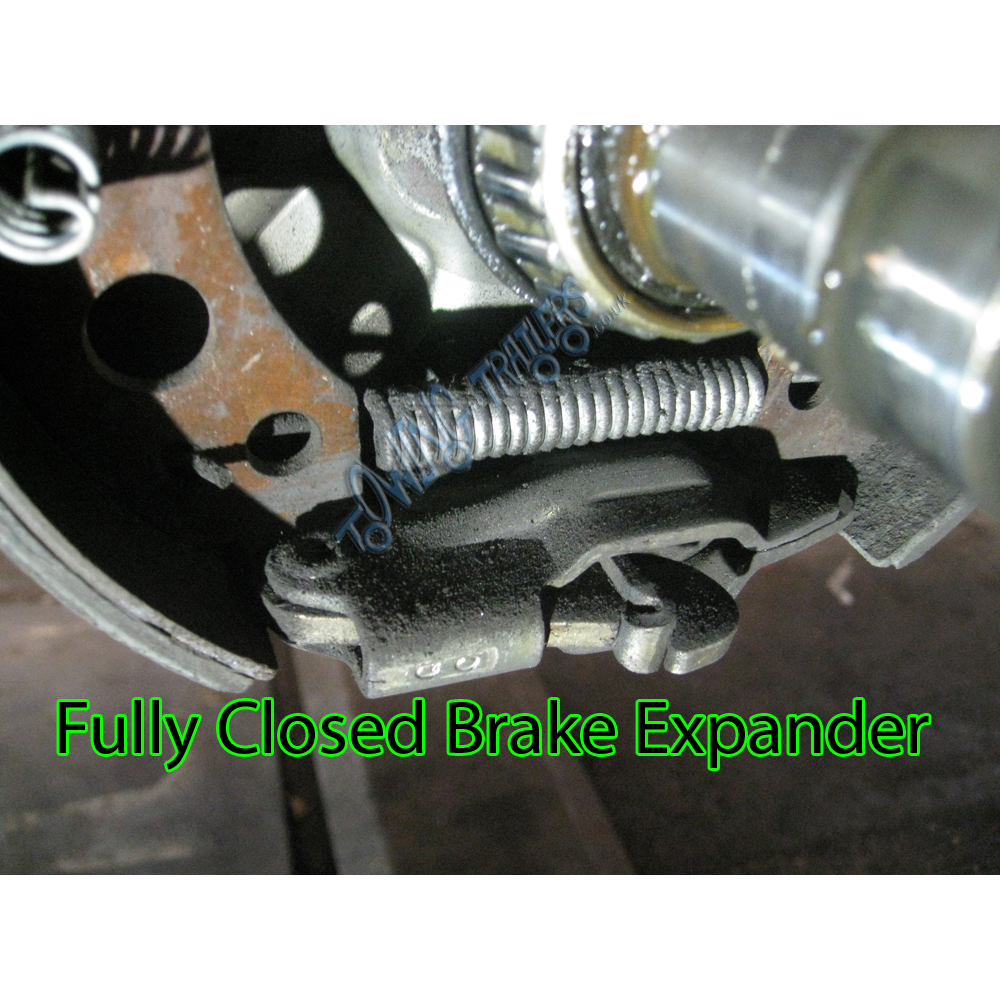
Your Brake Expander must be fully closed when adjusting brakes. The image below is showing this.
To check for movement in your Brake Expander you simply apply pressure to the expander with a screwdriver and it should press inwards and then spring quickly back. The image below is demonstrating this method.
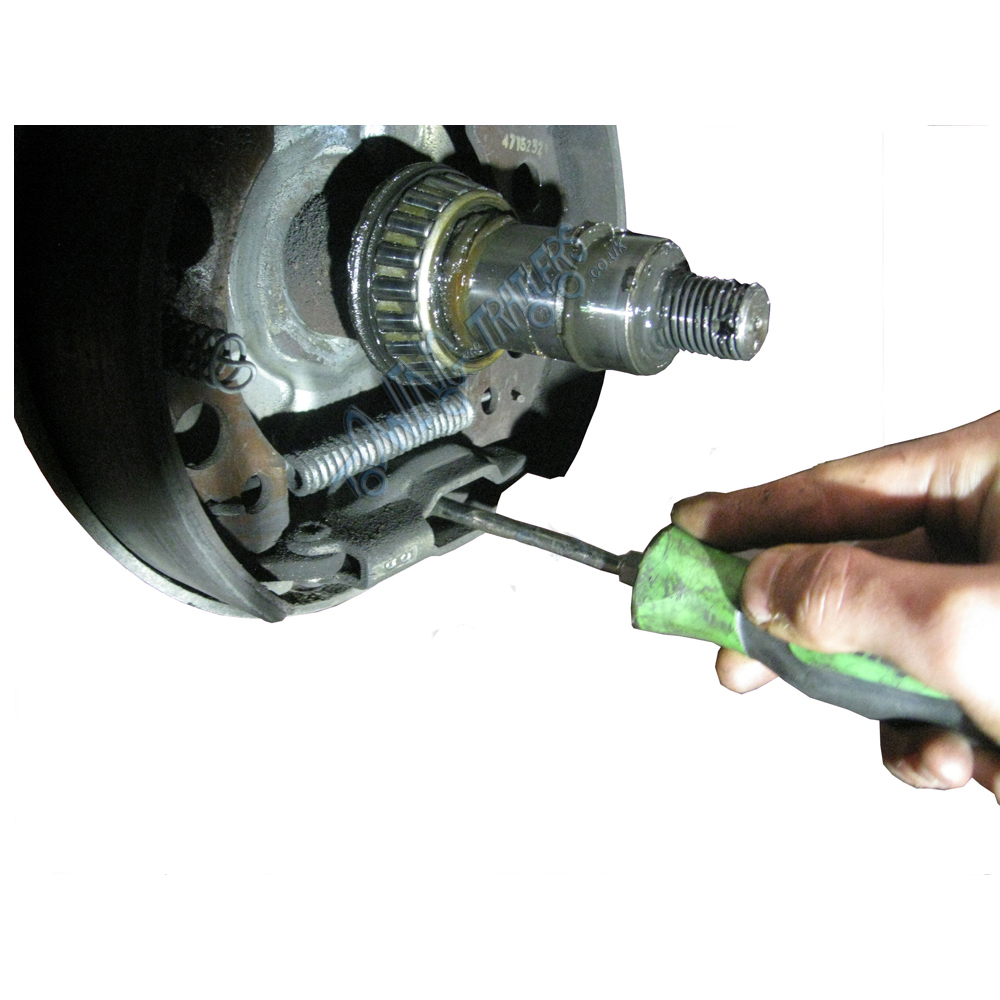
All of the above being well, you can then begin the Brake adjustment Procedure.
Start by removing the green plastic plug that is on the back of you Brake. These are shown in the image below.

Then you will need to take a Flatbed Screwdriver, put it through the whole where the plug has just removed and rotate the adjuster in accordance to the arrow that is shown on your Brake.
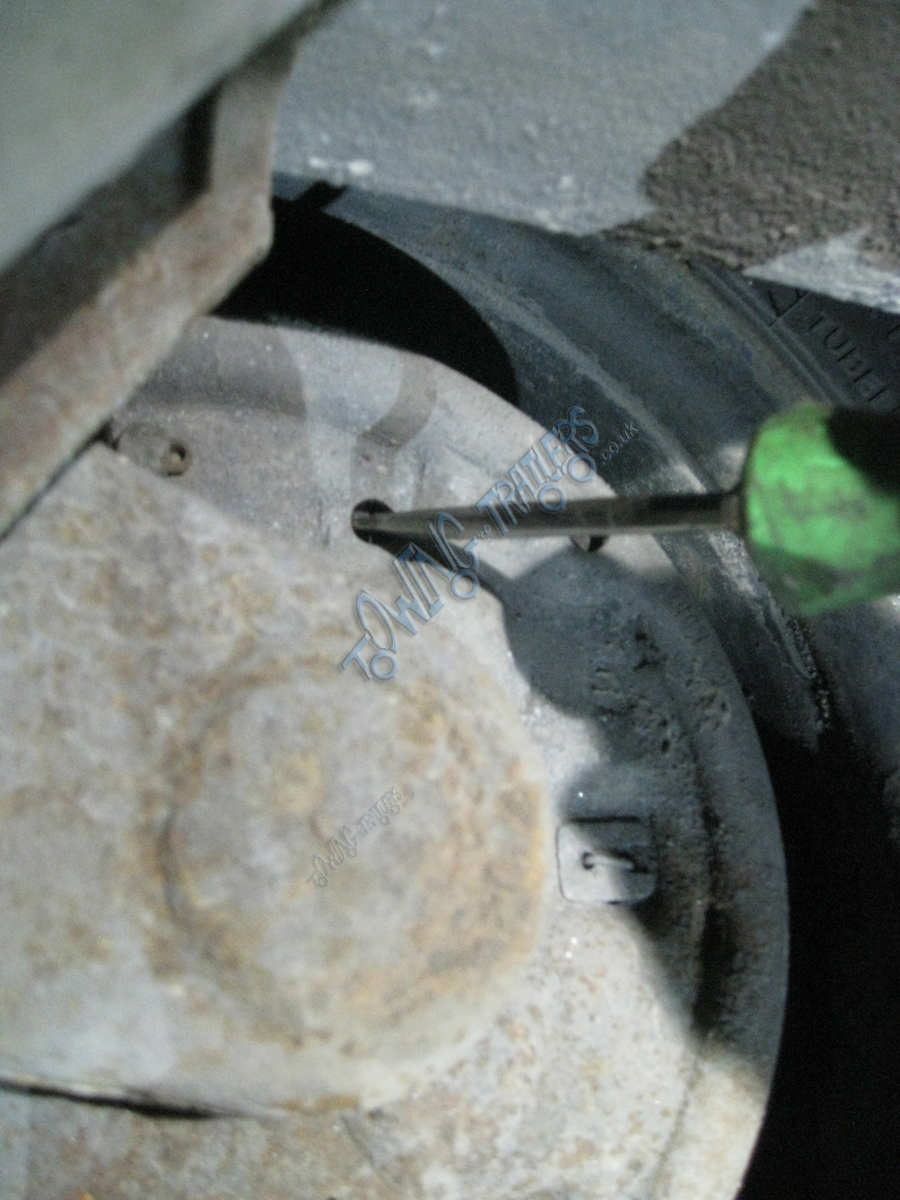
The image below is showing the the arrow for direction of adjustment.

You will feel your brake clicking as you rotate the adjuster. Keep doing this until the wheel locks and it can no longer be pushed forward with heavy force. Once you reach this point, you need to rotate the adjuster in the opposite direction, but only until the wheel slackens and can be span approximately one and a half rotations freely.
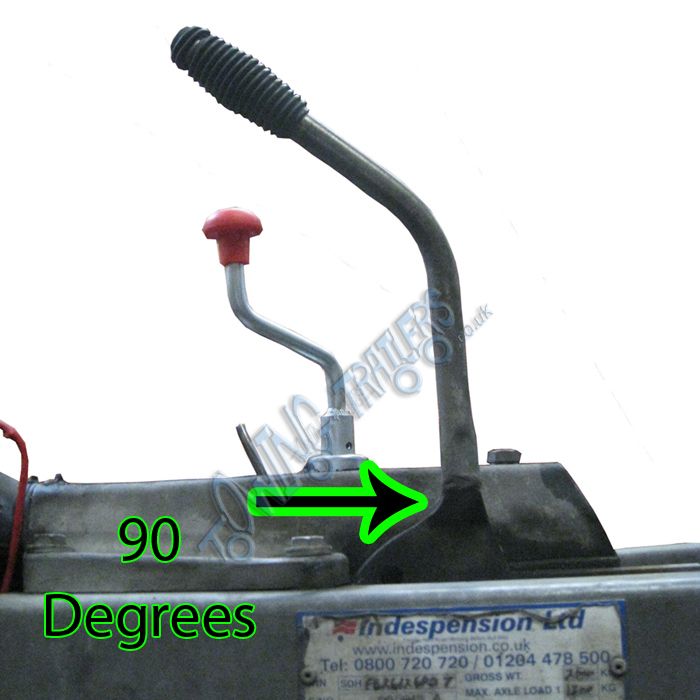
Once this is complete, you need to adjust your main Brake Rod. To do this you need to re-tighten the nut you loosened at the very start of this procedure, keep altering the tightness of the rod until, when tested, the Handbrake sits at a comfortable 90 degrees angle when pulled up. See image below.
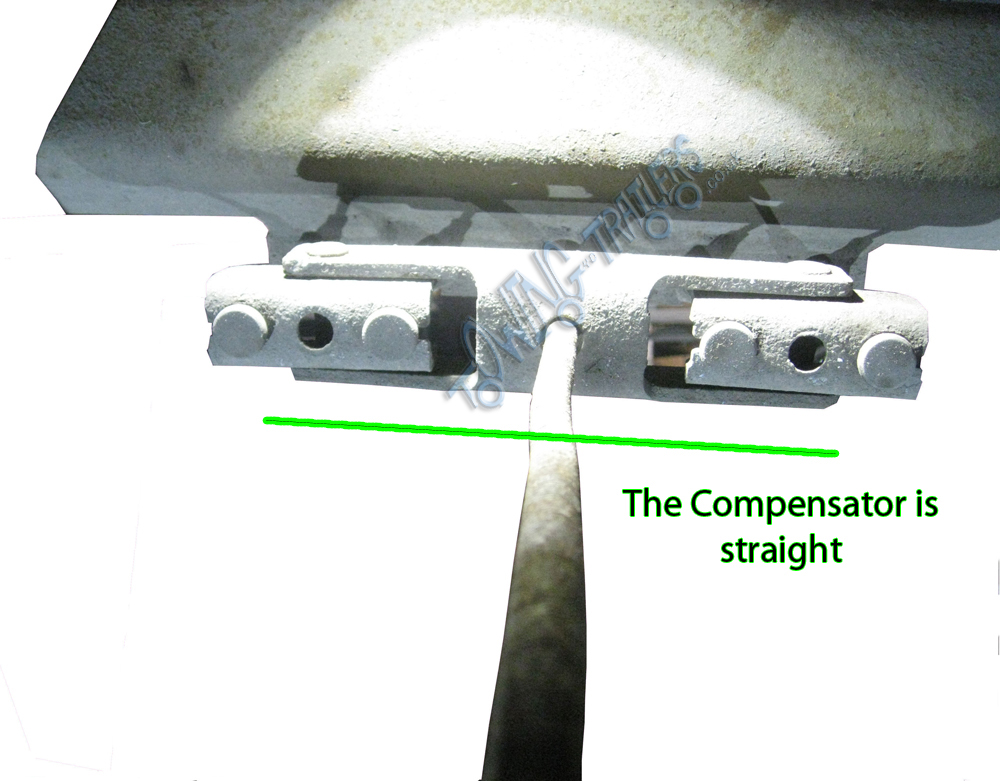
You will also notice that your Brake Compensator is inline and should not be sagging or looking ‘weighed down’ at one end. If you Compensator is sagging, you will need to go back and check your brake adjustment.
Finally, whilst the Handbrake is on, push all the wheels on your Trailer backwards as far as they’ll go. The handbrake should then move even further back.
The Different Sizes of Brakes available
| Knott |
Al-Ko |
| 160mm x 35mm |
160mm x 37mm |
| 200mm x 50mm |
200mm x 35mm |
| 203mm x 40mm |
200mm x 51mm |
| 250mm x 40mm |
230mm x 61mm |
Click below to buy Brakes or for adjusting Knott Brakes
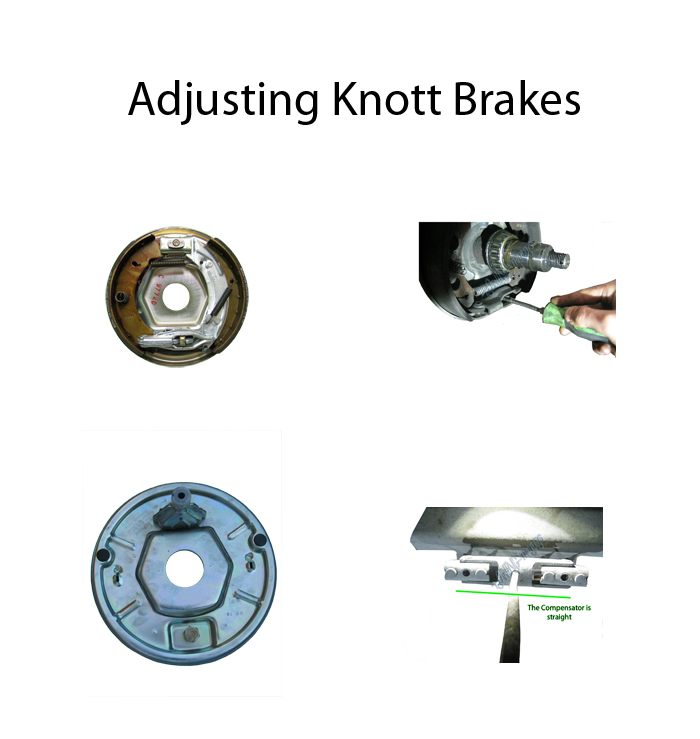 |
The 2 main manufacturers of brakes in the UK, these are Knott and Al-Ko. There are 2 other manufacturers which are used in the UK; these are Bradley and BPW (BPW fitted to Graham Edwards Trailers).
This guide will help you to indentify Knott and Al-Ko Brakes.
Identifying Knott Brakes
These can be recognised, without removing the drum, from the back
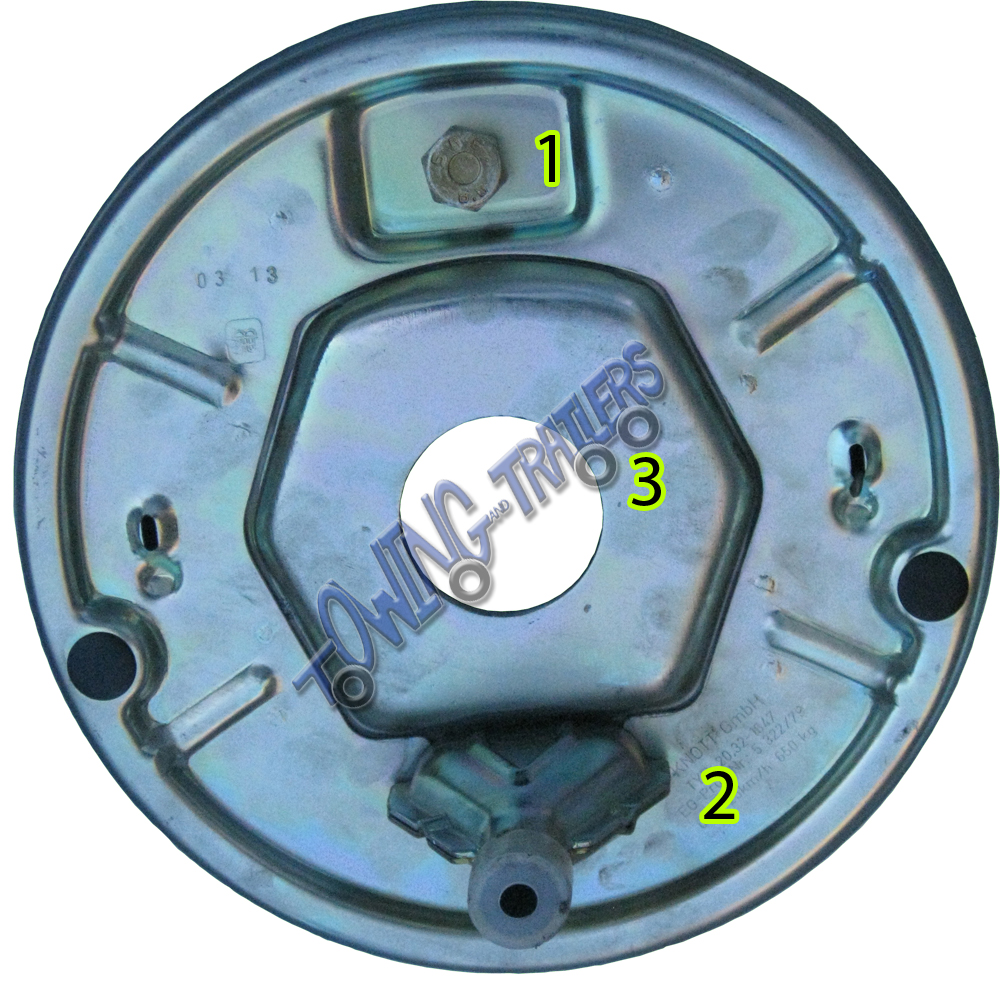 Number 1 Is the Adjuster which is a Hexagon shape on Knott Brakes. It is positioned directly opposite where the brake cable enters. It fits a 17mm spanner on 160mm, 200mm, and 203mm brakes. On 250mm Brakes the adjuster is 19mm. Please note this is the same as a Bradley and old peak Brake, but these are not very common.
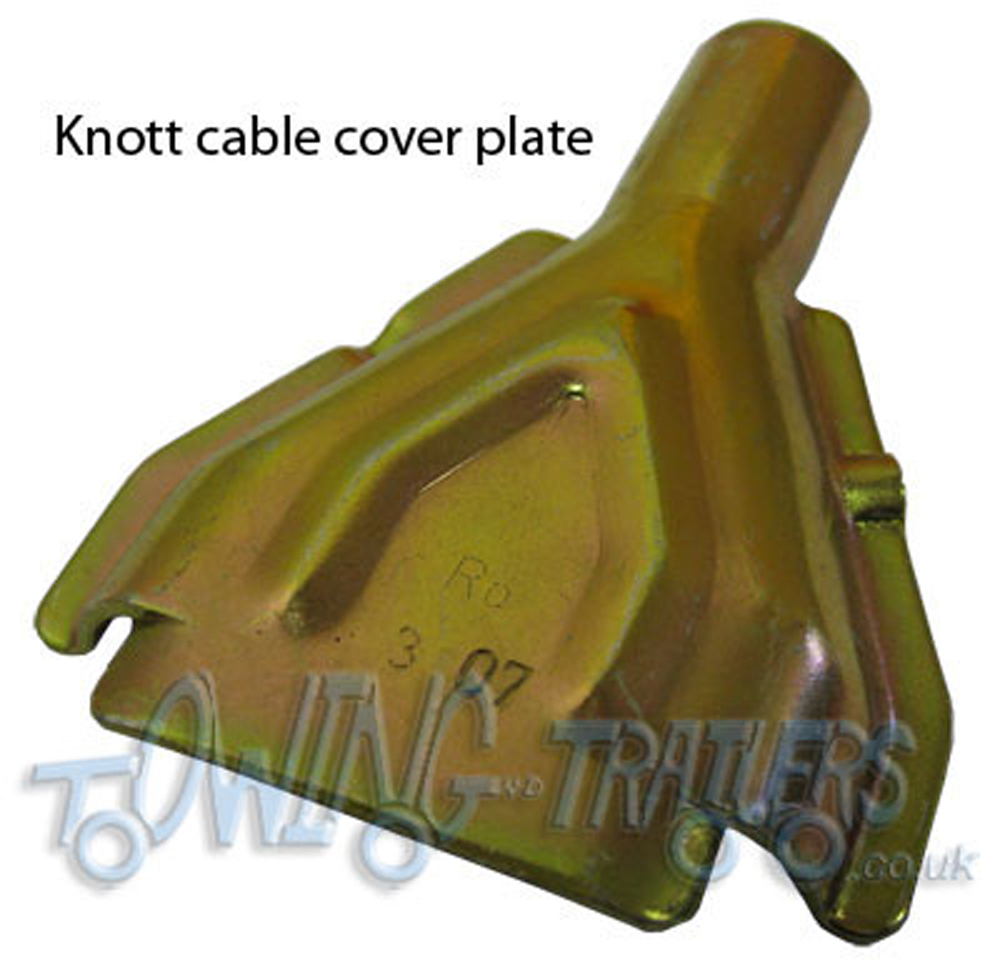
Number 2 The Cable Cover Plate is unique to Knott as there is a ‘V’ stamped on the plate. The diameter of the end is 18mm and accepts a cable where the outside of the cup is 22mm. This plate is the same on all sizes of Knott brakes. See image below.
Number 3 The hexagon shape and the forming of the back plate can vary please do not use this to identify your brakes.
Knott Brakes can also be identified from the front of the Brake
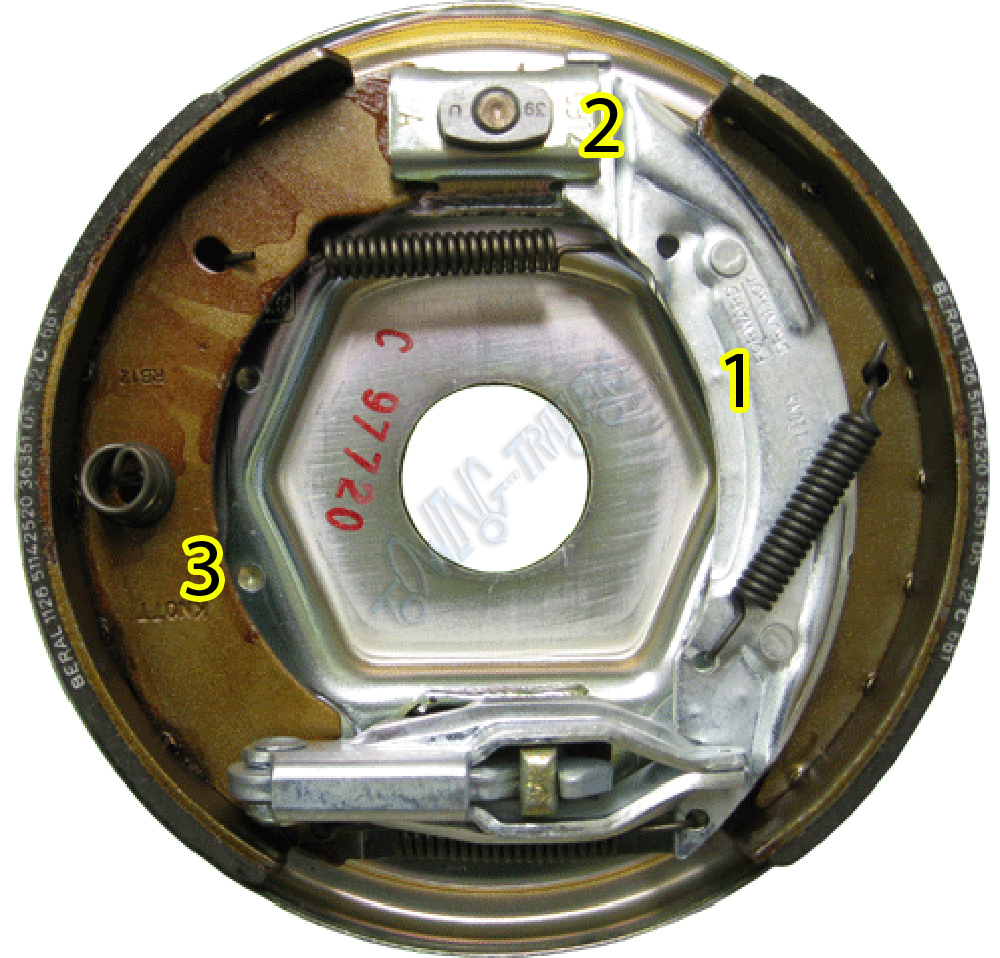 Number 1 The Brake Shoes are on a slipper with 2 springs and are mounted in their own carrier. This shows the reverse mechanism on the brake which attaches to the shoe.
Number 2 The Adjuster is a small wedge shape and is positioned directly opposite where the brake cable enters.
Number 4 You can see that ‘Knott’ has been stamped on the brake shoe making it extremely easy to identify your trailer brake. This only appears on genuine Knott brakes.
Identifying Al-Ko Brakes
These can also be recognised, without removing the drum, from the back
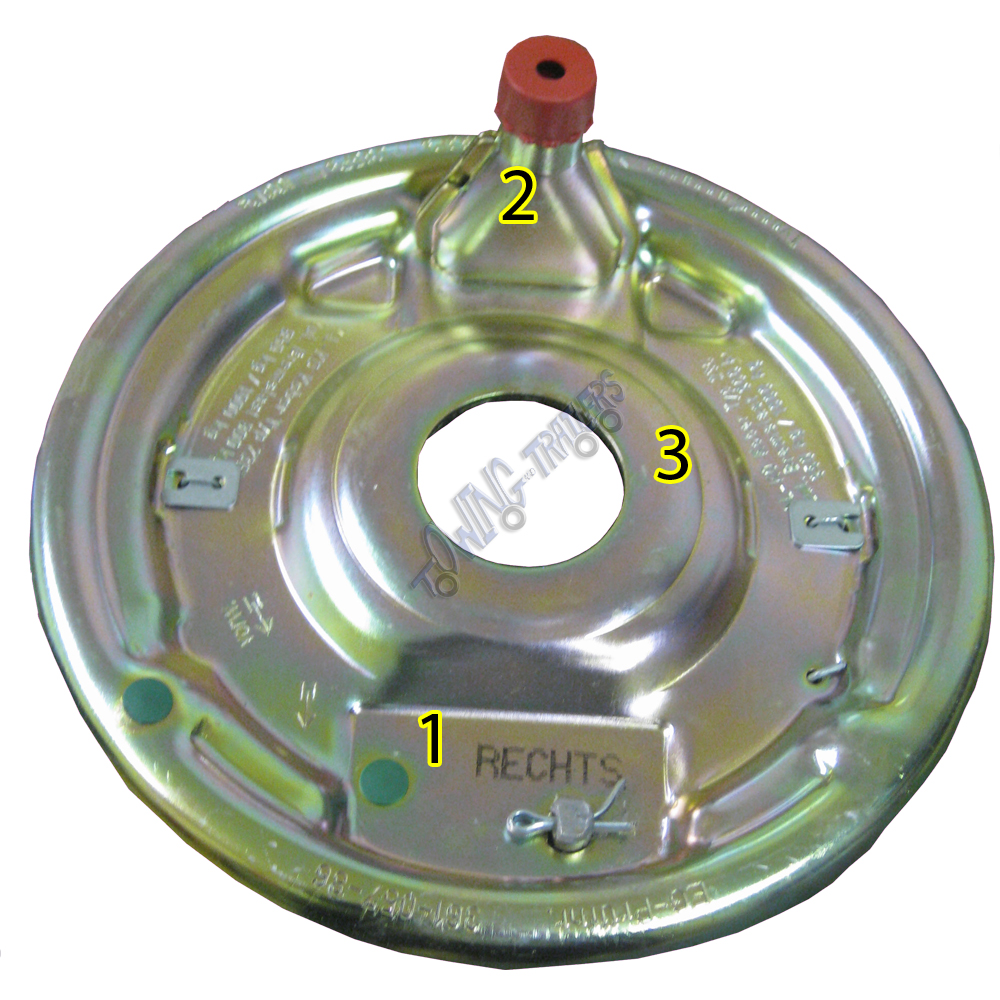 Number 1 The Adjuster on an Al-Ko Brake is very different from that of a Knott Brake. The green circular caps are removed to enable brake adjustment.
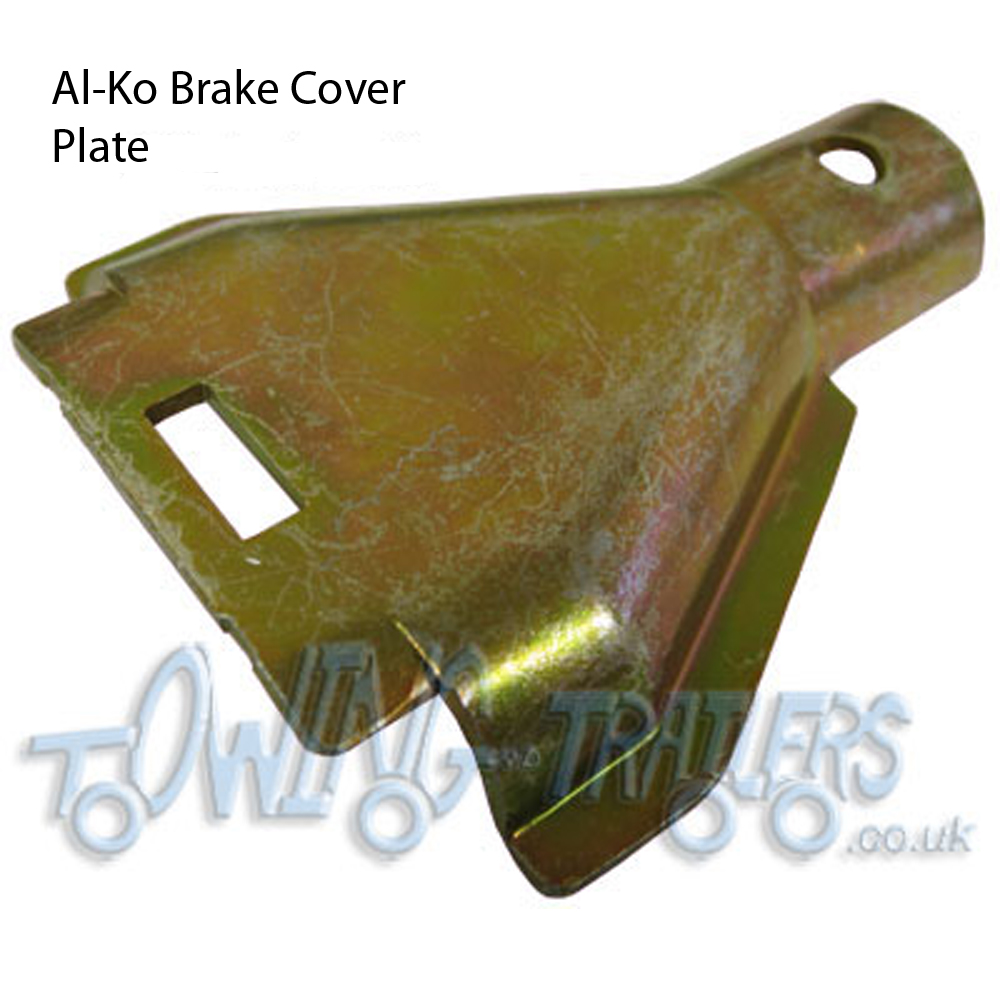
Number 2 Shows how the Brake Cover Plate has a smooth surface without the ‘V’ stamped on it. This makes identification between Knott and Al-Ko brakes much easier.(see image below)
Number 3 The raised circular shape on this brake should not be used for identification purposes as the shape can vary for each different brake.
Al-Ko Brakes can also be identified from the front of the brake
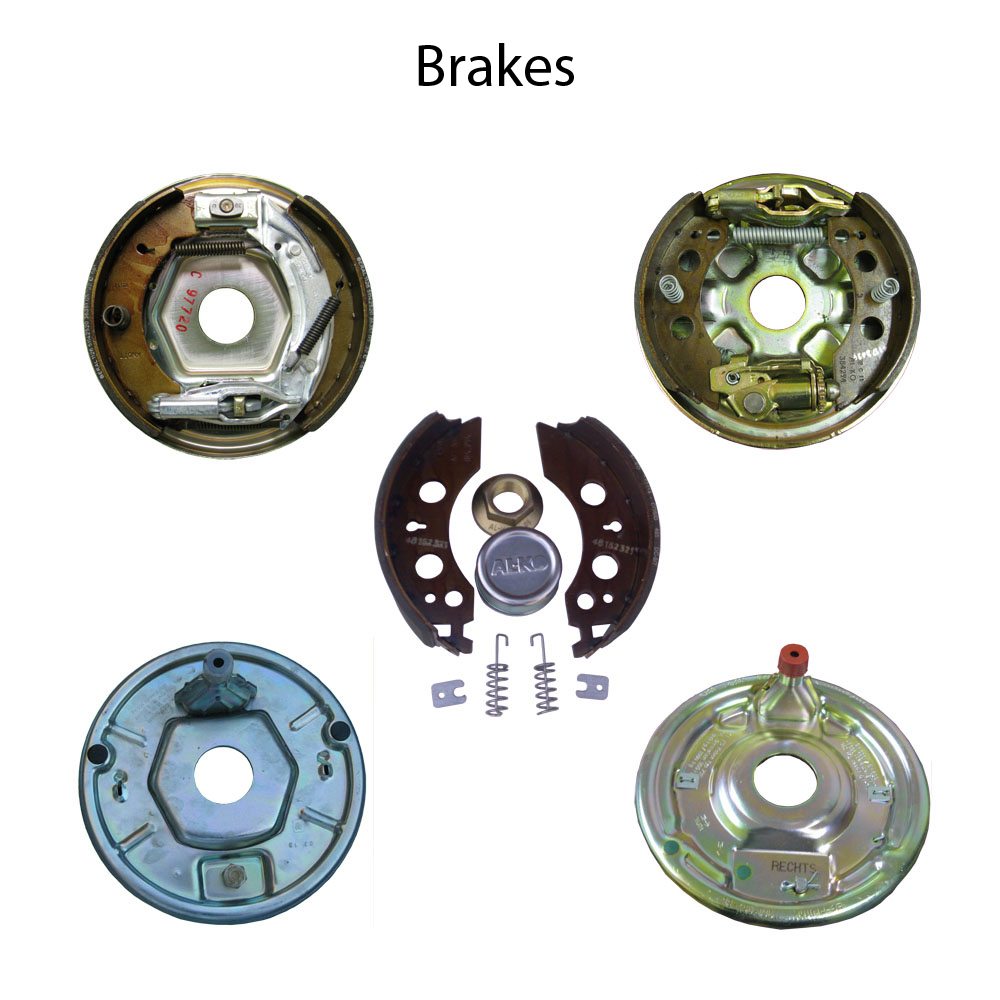
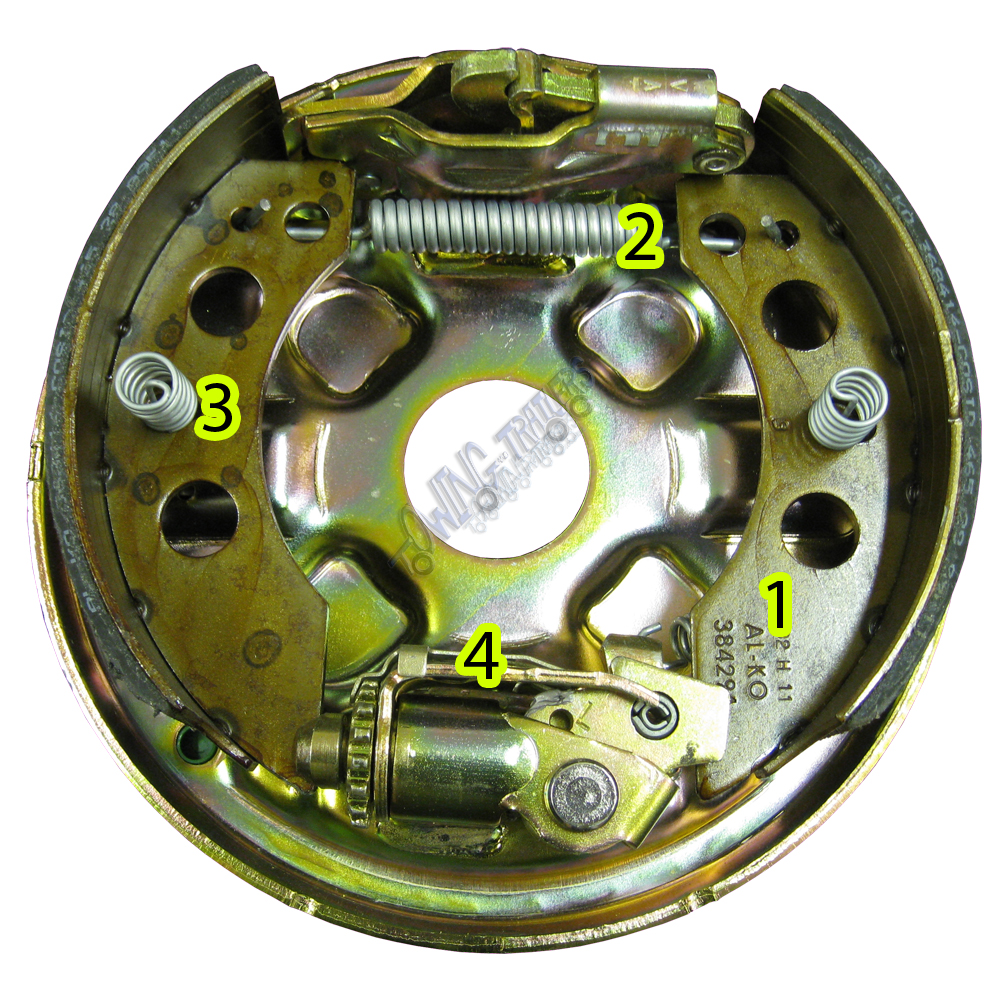 Number 1 Showing ‘Al-Ko’ has been stamped on the brake shoe which makes it very easy for you to identify your brake shoe. Be aware that only Genuine Al-Ko brakes have this stamp, copies will not.
Number 2 There is only 1 shoe tensioning spring. This is placed between the expander and holds both shoes together. This is different to Knott as the shoe tensioning spring is placed outside of the expander.
Number 3 Shows that there are Retaining Springs on both shoes whereas on Knott there is only 1.
Number 4 Is showing that the Al-Ko Brake has a CAM operated auto reverse mechanism.
How to Measure Brakes
 To measure a Brake Shoe You simply take a tape measure and place it across the face of the shoe. This gives you the measurement for the width of the shoe and is extremely helpful to know when purchasing your Brake Shoes.
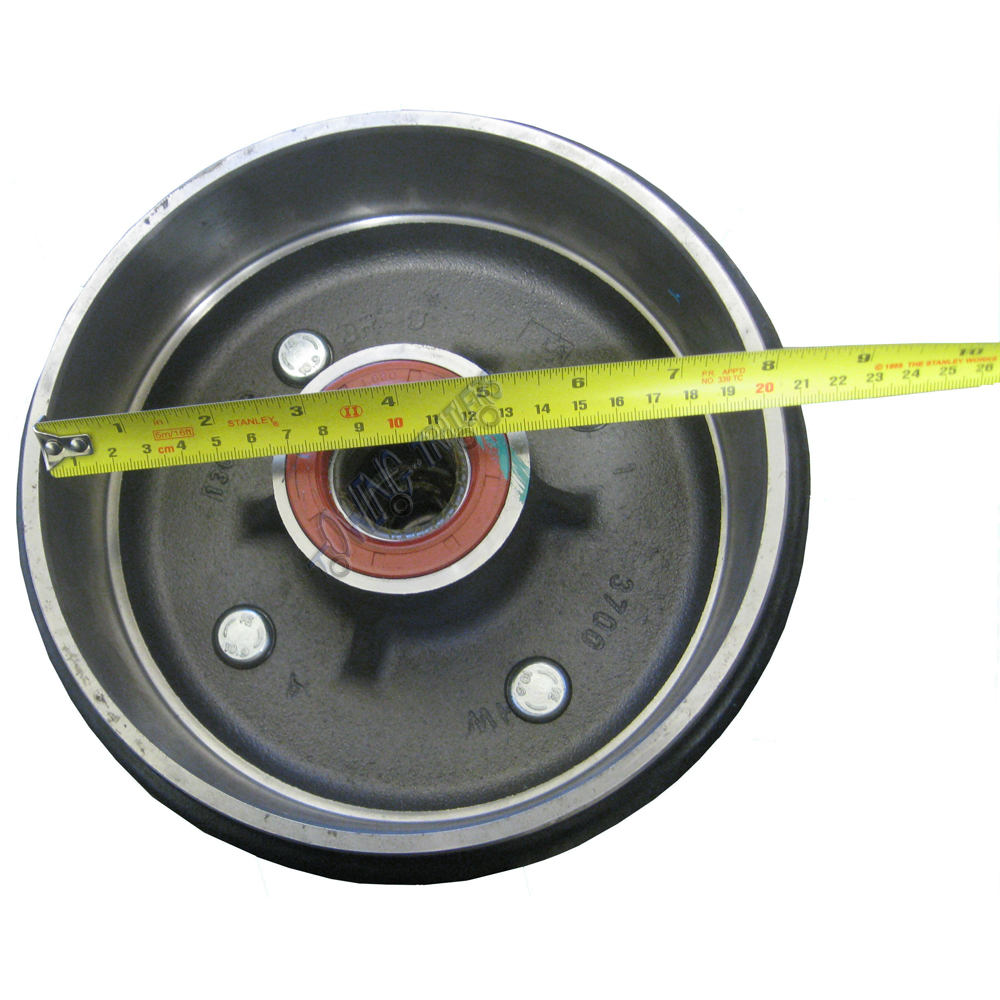 To measure a Brake Drum You need to place a tape measure along the inside of the brake drum. This gives you your internal diameter and helps determine which brake it is you need.
The Different Sizes of Brakes available
| Knott |
Al-Ko |
| 160mm x 35mm |
160mm x 37mm |
| 200mm x 50mm |
200mm x 35mm |
| 203mm x 40mm |
200mm x 51mm |
| 250mm x 40mm |
230mm x 61mm |
Click below to buy Brakes
Back to Top |
Comments Off on Identifying Trailer Brakes
LED Autolamps NEW harness system.
LED Autolamps launched the harness system in April 12 for LED Lights on commercial Vehicles and trailers.
This solution is designed to work all road lights on all trailers and commercial vehicles.
LED Autolamps have made a kit that is easy to add additional marker lights and number plate lights with plug in cables and T pieces.
Reasons for using LED Autolamps Harness system
- Reduced time fitting :- This can save many hours wiring complex lighting systems
- Lower skill needed :- Fitters required to use this system do not need to be skilled as the lights just plugs together (except front cable) no skill required
- IP67 insulation :- Due to the plugs and cable joints the lights are submersible to 1m
- Easy alterations :- Alterations can be done easily as the plugs can be unplugged and lights added or removed easily
- Maintenance :- If a light is broken they can be unplugged and swapped
This kit is designed to use only LED Autolamps marker lights but cables are available to fit other brands of rear lights.
Currently the rear lights that LED Autolamps offer in our opinion are not suitable smaller trailers.
However we find that customers are using the marker and number plate system due to it costing less than £4 extra per light for all the benefits shown above.
This is done by using a marker light cable to supply power from a rear light or junction box with the plugs cut off the feed end,
then plug the lights together using the T pieces and marker light cables as usual.
Please see the Image below for full details of the components.
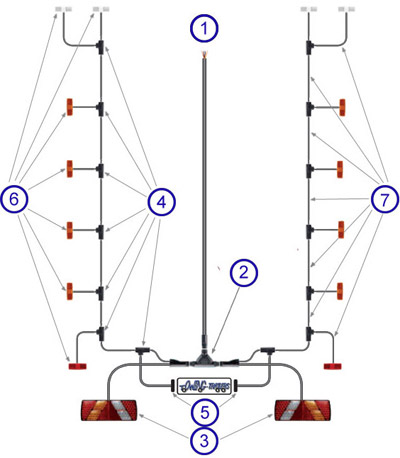
LED Autolamps Harness system Diagram
This has a bare cable at the front and an 8 pin plug on the rear.
This can be wired into a plug (recommended 13 pin) or attached to a junction box.
The 8 pin plug on the other end is designed for use with the harness system only, to supply power to the T piece.
This is available in 5 lengths listed below.
4m, 6m, 9m, 12m, 15m
2. 8-6pin Tee Piece
The 8 core cable plugs in to this.
On the sides there are 2 x 6 pin sockets these are handed to ensure the correct lamp is connected.
3. Rear lamps.
LED Autolamps offer a few lights with pre wired cables
All pre wired cables have a 6 pin plug with a 2 flying leads with male connectors to accept marker lights or number plate lights.
Cable lengths available on lights are
1.2, 1.8 and 2.4m
Also available are 4 cables with bare ends (.6, 1.2, 1.8 and 2.4m) to fit other lights, these also have flying leads for markers and number plate lights.
4. 2 core T piece.
This is designed to split the power supply for marker lights and number plate lights.
It can be used at any point on the 2 core system.
This has 1 female end to accept power and 2 male ends to supply power to lights, another T piece or Marker light cables.
5. Number plate lights.
Number plate lights can be supplied with a short piece of cable and female plugs to be powered from a T piece or Marker light cables.
6. Marker lights.
Marker lights can be supplied with a short piece of cable and female plugs to be powered from a T piece or Marker light cables.
These are available in different styles.
1491 Classic Rectangular marker with a bracket to mount at 90 deg
1490 Classic Rectangular marker Surface mount
44 Low profile marker 12mm thick with integrated reflector surface mount.
58 Small marker 58mm long x 35mm x 19mm thick Surface mount.
181 Small round marker 28mm OD only 9mm thick (visible) these require fitting into a 20mm hole with clearance behind.
Also LED Autolamps offer Outline marker lights to suit this system.
These are available surface mount or stalk mount, in 2 or 3 colour.
7. 2 core Marker light cables.
LED Autolamps offer 5 lengths of marker light cables.
1m, 2m, 3m, 4m and 5m.
These can be used to.
Join Marker lights, number plate lights to T pieces if the cable on the end of the light will not reach the main cable.
This is ideal if you are running cables down the chassis and you need to join the marker lights on the side of the trailer / Vehicle.
Joining T pieces together.
Powering high level marker lights or number plate lights.
We find this is currently the best solution on the market for LED Vehicle / Trailer lights. Due to the ease of adding lights and the quality of the connection being IP67 ( submersible to 1m ) as most failures of LED trailer lights are due to water ingress where water gets into the light down the cables where there are poor connections.
This is still to be tested due to the age of the system, however the plugs are similar to the ones used on the G2 system manufactured by LED Autolamps and these have been very successful in the UK since 2009 and Australia since 2007.
This system does have a few issues due to the limited range of rear lights available and the fact that only 1 set of rear lights can be plugged in currently this does not allow separate units ( modular lamps ) separate fog or separate reverse or the option of additional lights such as high level lights for additional visibility. in our opinion with the large range of lights and configurations that may be used on a trailer there do need to be more options of lights available.
To purchase lights for the LED Autolamps Harness system from Towing and Trailers please click here.
For cables and connectors click here.
Back to Top |
Comments Off on LED Autolamps Harness system for trailer lights
Tags: 12 volt, 12v, 24 volt, 24v, Amber, Harness system, LED, LED Autolamps, LED trailer Lights, light, Lights, Marker light, multivolt, numberplate light, outline, Plug-in, Red, trailer, White
Back to Top |
Comments Off on Radex trailer light plug in systems
Tags:
Trailer servicing – maintenance schedule
Many people don’t understand a trailer needs Servicing in a similar fashion to a car. To help people do this we have a trailer servicing – maintenance schedule as a guide. It is more important to service a trailer than a car because:-.
- Trailers carry a lot of weight as a result can cause damage or serious injury.
- If a trailer becomes detached or has a major problem you are not in control.
- There is no MOT for a trailer and as a result end up in poor repair.
- Vosa are checking trailers more often for road-worthiness. A driver can get points or a trailer seized due to poor maintaince.
Maintenance of the trailer is the responsibility of the trailer owner or transport manager of a company. in addition you should not tow a trailer if you are aware of any problems. Poor maintenance of a trailer can result in Catastrophic results. Please read NTTA Article.
We have listed below the minimum a trailer owner should do to ensure a safe trailer. This can differ because trailers that are submerged and used in harsh or off-road environments may need more.
Checks to be made on your trailer every trip
- Lights work correctly
- Coupling has no play on towball.
- Tyre pressures
- Wheel nuts (correct torque)
- Breakaway cable / Secondary Coupling chain / cable
- All fasteners are secure and working.
- Correct Number plate displayed
- Load is secure and positioned correctly.
Checks to be made every 500 miles
- All items under Every trip
- Brake adjustment
- Play in Bearings
- Any bolted Connections / fittings (new trailers only)
Trailer Servicing Major Service (Braked trailers)
You should carry out a major service at the following intervals.
- 3 months / 3000 miles on commercial trailers with intensive use & boat trailers
- 6 months / 6000 miles on light use trailers
- It is also advisable to do this if you have just brought a used trailer
Check the following items
- All items under Every trip
- Check Bearings
- Remove hubs
- Inspect Brake Shoes and springs
- Inspect Drum for damage
- Brake Expander
- Brake cables
- Auto Reverse Mechanism
- Taper roller bearings clean and regrease
- Adjuster operates
- Re assemble and adjust the brakes.
- Check condition of wheels and tyres
- Check uneven wear on tyres because this can indicate axle problems
- Visual check Wheel alignment for bent axles ( this is not easy on a single axle trailer.)
- Check for Vertical play in Drawbar
- Grease coupling
- Check coupling Linkages
- Coupling bellows need checking for damage
- Check coupling Damper
- The operation of the handbrake
- Check operation of jockey wheel
- Inspect wheel on jockey wheel
- Inspect wiring for damage
- Body fittings are secure and also operate correctly
- Bolted connections need checking as they can work loose especially axles and couplings.
- Props, jacks if fitted
- General condition (bodywork, chassis for bends and cracks)
Trailer Servicing Major Service (Unbraked trailers)
You should carry out a major service at the following intervals.
- 3 months / 3000 miles on commercial trailers with intensive use & boat trailers
- 6 months / 6000 miles on light use trailers
- It is also advisable to do this if you have just brought a used trailer
Check the following items
- All items under Every trip
- Check Bearings
- Taper roller bearings clean and regrease
- Check condition of wheels and tyres
- Check uneven wear on tyres because this can indicate axle problems
- Visual check Wheel alignment for bent axles ( this is not easy on a single axle trailer.)
- Grease coupling
- Check operation of jockey wheel
- Inspect wheel on jockey wheel
- Inspect wiring for damage
- Body fittings are secure and also operate correctly
- Check all bolted connections as these can work loose especially axles and couplings.
- Propstands, jacks if fitted
- General condition (bodywork, chassis for bends and cracks)
Safety and cost.
If you keep to this trailer servicing – maintenance schedule you will maybe find there is not much wrong with your trailer. When a trailer is serviced regularly pick up small problems that are probably rectified easily. A small problem can end up costing money or cause more damage when it is not found early.
When trailers are left to stand you still need to service the trailer as brake parts, bearings and couplings can all corrode or seize through lack of use, tyres can perish and electrical s can corrode and stop working.
Regular servicing can stop the following problems
Customers that leave servicing too long regularly have the following problems.
Trailer brake cables
Brake cables seize and due to the lack of movement the expander seizes leaving the brakes in an open position. As a result the brake shoes rub the brake drum that wears the shoes. Brake shoes rubbing on a drum may also result in damage to the drum. This can also effects the brake efficiency and the amount of fuel used to tow. When you really need the brakes they do not work. This can cause an accident for the cost of a brake cable.
Wheel bearings
With wheel bearings you usually will get a bit of warning (play) before a bearing fails. When a wheel bearing fails the whole wheel usually comes off this can damage the shaft as it comes off or if the shaft hits the floor. This means a new axle / suspension unit at an high cost also a trailer wheel can cause a lot of damage/ injury if it hits something or a person.
Accredited trailer servicing.
The only scheme in the UK that accredits and inspects trailer service centres is NTTA QS.
Service centres that have NTTA QS require a yearly inspection to make sure the company is meeting current standards.
Towing and trailers Ltd has been the only NTTA QS Trailer centre in Nottinghamshire since 2012.
If you require a trailer service Please feel free to call us on 01909 473749 to find out more.
For people that can not have a service because they are too far away please got the NTTA to get a quote from your nearest Trailer Service centre.
Back to Top |
Comments Off on Trailer servicing – maintenance schedule checklist
Tags: bearings, brakes, couplings, Lights, trailer maintainance, trailer maintenance checklist, trailer maintenance schedule, trailer service, trailer servicing, trailer tips, wheels
AJ.BA are a popular manufacture of lights These are used on Erde and Daxara trailers amongst others they offer an in expensive light and wiring solution for trailers.
The cables have a 7 pin 12N plug on one end to plug in to the tow vehicle with 2 cables coming out of it.
On the other end of the cables are green and yellow 5 pin bayonet plugs these are similar to the ones used by Aspock although they are not compatible.
This system is an easy and cheap solution for trailers not requiring marker lights and it can be fitted in minutes.
This system does not have any provisions for marker lights.
Aj.BA offer 6 different lights to fit these cables.
for another in expensive range of plug in lights that offer a plug in system but only 3 suitable lights try the Radex plug in system.
Back to Top |
Comments Off on AJ.BA Plugin Trailer Light system
LED Autolamps is one of very few Company’s that manufacture a plug-in system for LED lights on trailers. The system has been around over 10 years in Australia the system was Developed for the Australian market and the lights were approved for use in Europe in 2009 this system is now available in the UK.
The LED Autolamps System is very Simple it comprises of 3 cables in Various lengths to suit your trailer. See image below.
The first cable has a trailer plug with 1m of 5 core cable to a waterproof 5 pin plug.
The second cable is LED Autolamps class as a lamp to gooseneck Cable. It is available in 7 different lengths from 3.7m – 7.3m. This cable has a 5 pin socket to join to the first cable. it is designed to run from front to rear of the trailer along the right hand side. On the end of the cable is a Tee shaped plug, this plug plugs into the rear light on one side then has another plug for to accept the 3rd cable. From the edge of this plug there are 2 cables (Brown Power and White Earth) these are approximately 100mm long and can be used to power marker lights from. these come sealed on the end. if a joint is made on these it is recommended that a water tight joint is made using a heat shrink seal or super seal plugs.
The third cable is LED Autolamps class as a lamp to lamp cable and is available in 6 different lengths from 1.1m – 2.1m. this has a socket on one end that attaches to the second cable and a plug on the other end to attach to the other light. if these cables are not long enough 2 cables can be joined together to make your desired length. This cable also 2 cables to couple up marker lights.
This system is only suitable for 5 LED autolamps Lights the 200BARLPM2 (Boat trailer lamp kit) the 150BARE Rectangular 12v, 150ARME Rectangular Multivolt, 100BARE Square 12v and 100ARME Square Multivolt
Back to Top |
Comments Off on LED Autolamps Generation II plug-in system.
Aspock are one of the leading light manufacturers for Trailers used by a lot of manufacturers as original equipment.
These lights are one of the better quality lights but spare parts ie lenses are very expensive (almost as expensive as the light itself).
Aspock have an expandable Plug in system available that means that there is no need for junction boxes.
This is trailer light wiring made easy.
The Aspock system also makes Maintance and repairs easy.
The Aspock system starts with a trailer plug with 2 cables to supply the rear lights.
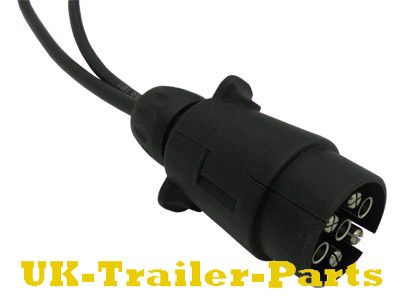
Front of aspock trailer light cable
Most Aspock rear trailer lights have a 5 pin Bayonet connection / socket on the back of them, shown on the image below.

Aspock 5 pin Bayonet socket
The 5 pin plug is designed for a cable like the one shown below to be plugged in.
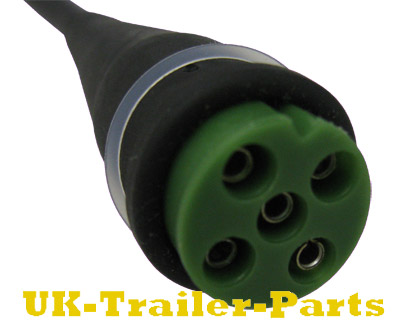
Aspock 5 pin Bayonet plug
Aspock also offer cables with a DC-Flat Cable that comes out of the back of the plug (shown below)

Aspock 5 pin Bayonet plug with additional DC-Flat cable
The DC-Flat cable comes with sealed (over moulded ) on the end to stop water penetrating and corroding the cable inside.

Sealed end of Aspock marker light DC-Flat cable
The DC-Flat cable supplies power from your rear lights for marker lights and number plate lights to be added.
This cable joins to other DC-Flat cables on lights or an extension cable using an Aspock DC connector (shown below)
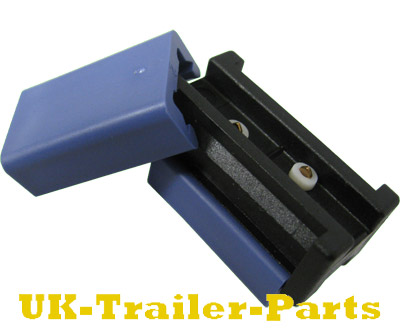
Aspock DC connector
The Aspock DC Connector clicks shut on 2 cables giving a water tight connection on to the 2 cables. Image below shows a connector Ready to Click shut on 2 cables.

Aspock DC connector shown on 2 DC-Flat cables
Once the DC Connector is clicked shut pins inside penetrate the cables giving an electrical connection between the cable and small silicon seals around the pins keep the connection water tight.
This process can be repeated to add extension cables + additional lights.
Spare parts are available for the Aspock system such as plugs and sockets with single and double grommets to make adaptors to run more than 1 rear light and various length main cables and DC-Flat cables to make a bespoke wiring loom for your trailer.
The DC-Flat cable can be purchased separately to run Aspock marker lights from other lights
The DC-Flat cable is a fast and simple way to add additional marker lights to your trailer.
To purchase Aspock Lighting equipment please go to our Aspock Trailer light section on our
Ecommerce shop.
Back to Top |
Comments Off on Aspock Trailer light plug in systems


 Number 1 The Adjuster on an Al-Ko Brake is very different from that of a Knott Brake. The green circular caps are removed to enable brake adjustment.
 Number 1 Showing ‘Al-Ko’ has been stamped on the brake shoe which makes it very easy for you to identify your brake shoe. Be aware that only Genuine Al-Ko brakes have this stamp, copies will not.
 To measure a Brake Shoe You simply take a tape measure and place it across the face of the shoe. This gives you the measurement for the width of the shoe and is extremely helpful to know when purchasing your Brake Shoes.
 To measure a Brake Drum You need to place a tape measure along the inside of the brake drum. This gives you your internal diameter and helps determine which brake it is you need.


